As An Amazon Associate I Earn From Qualifying Purchases At No Extra Cost To You Learn more.
I’ve always loved greenhouses, but the concept really doesn’t make sense the way it is usually practiced. If you have to heat the greenhouse all winter, and the greenhouse won’t hold heat because plastic and glass is a poor insulator then winter use is very impractical. If a greenhouse gets too hot to grow anything in the summer and you actually have to empty it out completely because it will actually cook the plants, then summer time becomes a headache also. As much as I like greenhouses for their architectural beauty, I had given up on building one myself.

Then I began reading about “Earth Ships” which is an interesting concept of digging a home right into the South-facing side of a hill and encasing the exposed side with a greenhouse. The Earth Ship requires an extreme life-style change however. This type of building requires living-breathing people inside nearly every day to keep the delicate ecology balanced. Although fascinating, there was no way I was going to convince my beloved city boy to live in a narrow green house basement. Looking through all the photos reminded me of the very attractive sunken greenhouses I had enjoyed while living in England. Almost every castle or historic manor estate you tour in England features a few garden innovations to fascinate and educate. My very favorite was a sunken very modern glass greenhouse just a few steps from a matching the newly built café on the grounds. I haven’t found my photos yet of that large glass structure with black metal framings, but the photo below will give you a good idea of the concept behind it.

The brick walled garden is as about as common in England as the basketball hoop is in America. The British have long known how the dark red bricks could capture what little sun they enjoy there and store the heat for later in the day, therefore creating little micro-climates in their backyards. The idea of building lean-to greenhouses against these walls instead of stand-alone greenhouses was the natural next step. Just one further innovation of digging down 2 or 3 or even 4 feet improved heat retention greatly with no real loss in available sunlight. Turns out this isn’t a British invention though.

In 1978 the first reported Chinese-style sunken greenhouse was built. The design uses three solid earthen walls and one south-facing glass wall. It’s use really took off in the 1980’s when plastic film became widely available and could affordably replace the heavy glass. The Chinese government created an initiative to encourage more development of the concept and have been using sunken greenhouses to feed their growing population. China’s goal was to have nearly 3.7 million acres of passive solar greenhouses by 2020. A simple hole is sufficient for some greenhouse experimenters, but better results can come from constructing the walls with rammed earth and brick that does a better job of storing heat for slow release later. I remember reading as a kid this classic book about building a very cheap underground house that was in the pile of Mother Earth News Magazines. A $50 house is a pretty exciting idea when you are 13 years old! Looking up that 1980’s book led me to discover this greenhouse version of the concept published in 2007. I was totally hooked, and became obsessed with the idea.
Another term for this project is the “Walipini” which has it’s roots in Pineapple growing techniques and a greenhouse building project in Bolivia. The Walipini is touted in articles such as “build this greenhouse for $300”. As appealing as that looks at first blush, I’ve already spent the better part of an Easter weekend bailing water out of the basement of my house flip. The open stairwell leading down into a pit with no central drain raised a lot of questions for me. In addition, most traditional greenhouses suffer from curious mice and other varmints looking for a warm winter home and a spot of food. Earthen walls and a roof of plastic film are no match for a 24/7 attack of little creatures. Instead the greenhouse is trimmed in metal and clear corrugated panels like these are used.

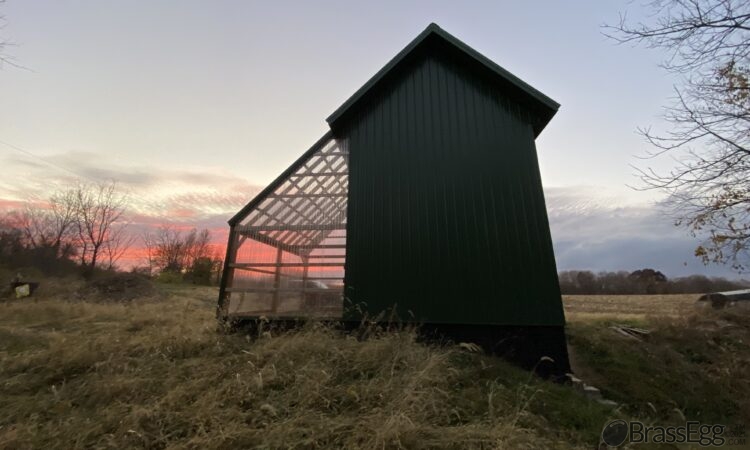
It was decided that instead of adding a little Walipini on the outside of the shed, that the shed would be expanded to have its own “built on” greenhouse. To prevent mice from building through the wall, the basement was extended as an addition. As in; instead of making the basement larger, we constructed a poured concrete wall between the shed construction and the greenhouse addition and only put a 36″ door way between the two. Each section has it’s own drain, but the likelihood of flooding is very low with a poured wall and solid concrete floor. The ideal depth for a Walipini is between 3 and 5 feet, but a standard basement depth is 8′ and trying to construct one part of the basement at a different depth would increase the complexity/cost of the build. Because the winter sun hangs so low at my latitude, any plantings will have to be raised at least 3 feet and would best be served at 5 feet during the late winter/early spring.

On 90 degree days in the summer the second floor of the greenhouse reaches 120 degrees! In the basement area of the greenhouse the temperature is usually 80-90 degrees, and the shed section of the basement ranges from 70-80 degrees. The summer, spring and fall work excellently in this greenhouse because the basement section does moderate extreme heat well, and lettuce continued to grow in 2020 well into fall and early winter. However, this design seems destined to fail as a winter green house. This very cold 2020-2021 winter found that inside temperatures were only about 5-10 degrees higher on cloudy days (and most winter days are cloudy here). Sunny days might see a bump of 15 degrees, but that heat quickly dissipates after the sun goes down. One reason the greenhouse isn’t holding heat is because of the walk-out basement door on the North side of the shed. This wall should have a large mass of backfill insulating it from the cold winds blowing off the bare corn-field, but instead much of the desired geo-thermal heat isn’t available because we weren’t able to completely finish the backfill project before the fill-dirt froze solid. Even with a perfect wall of backfill against that North wall, we would still constantly lose heat through the door though.

Sitting in the greenhouse this winter trying to figure out how to improve the winter usability factor highlighted how the ventilation is barely enough to keep pace during the summer, but is far too much in the winter. Sitting in the greenhouse on a particularly sunny and windy day, I could feel a draft. The first inch of snow on the ground reflected sunlight up under the floor joists and it was clear that the gap I was trying to cover to prevent mice from entering was also a factor in heat loss. I researched the dynamics of passive solar buildings and learned that the sun was heating up the air on the second floor, causing it to rise out the ridge vents at the roof top. This escape of heated air created a vacuum which drew in air from the very lowest levels. When a thick blanket of snow clogged all the air gaps around the foundation there was a noticeable change in the greenhouse climate. The greenhouse heated up and created the largest gap between interior and exterior temperatures it had seen all winter…almost 20 degrees. Covering the two floor drains also helped maintain that heat much longer after sundown than we had seen before. Ground pipes are often used in root cellars or greenhouse structures to pull in geo-thermally cooled or heated air…but in this case the short pipe is only pulling in air 18-inches under the surface of the ground and only 20 feet from the greenhouse. In winter it is really cold, in summer it is just a little cooler than the surrounding air. Covering both of these drains in the winter along with sealing the gaps around the foundation should create a better ‘air seal’ that so that heat rising to the roof ridge is held inside and can accumulate in the building by a vacuum. In other words, it will be less able to flow out the top while pulling cold air in through drains and gaps around the basement.

The summer plan is to install two vents in the upper-most peak of the greenhouse and perhaps also install a opening and screened window on the second floor. In the basement, both drains will be uncovered and the transom window over the basement walk-out will be unsealed, removing several layers of weatherization until only aluminum insect screening is left. This should purposely increase the amount of draft the green house can generate to pull heat out in the summer…but with designated windows and vents that can actually be controlled with insulated ‘shutters’ from the inside. This should make it much more pleasant inside the greenhouse for summer use.
Brass Egg™ participates in affiliate marketing programs. As An Amazon Associate I Earn From Qualifying Purchases At No Extra Cost To You Learn more. Brass Egg™ of Russell Holdings Group, LLC 2021. All content ©2021 Russell Illinois Holdings, LLC. All Rights Reserved.