How To Fix a Broken Aloe Vera

There are lots of articles about how to use Aloe and how to propagate more plants, but I’ve yet to find how to rehab one. I’ve killed my share in the past, and I want to learn the secrets. It would be special to give my grandkids the aloe my mom and dad used when I was a kid. I need to quit messing up so much before risking another one of my dad’s original ones.

I’ve already killed three aloes from my mom and one from the local garden club. I picked the latest one up at a big-box store so no one would give me that disappointed look when they asked how it was doing. It was growing fine all summer. It had survived the early Spring inside, slowly been adjusted to direct sunlight while the Greenhouse was being built over the summer and then moved into a 5 gallon pot the morning I broke my leg. Then I forgot about it completely. It grew very large in direct summer sun.

The week before Thanksgiving, fall frosts began to kill back the tomatoes and the aloe began to succumb. The bright green spears where turning dark, limp, even mushy where they had frozen overnight and burst open the cell walls. I had already pulled the Rosemary out of it’s pot and threw it into a bag. Grabbing the Aloe and yanking it by the stem wasn’t an option, so I thought I would tip it out of it’s pot. I misjudged and the whole plant slipped out with a sickening ‘crunch’….three feet from where I broke my leg. Hope my garden isn’t bad luck!

All the major spears where broken in various ways. I had remembered that as a kid the plant wanted to heal straight across cuts. In other words, the spear always ‘died back’ to the point of damage closest to the base. So I trimmed all the damaged spears straight across with a butter knife.

Day 1-November 20

My dad always made a point to only harvest one spear at a time. He wouldn’t break a tip off this one, then break a tip off that one. My dad was a regular user of Aloe for cuts and burns, so the spike he chose would eventually be completely used up. I just thought Dad was tidy.

Day 3-November 23

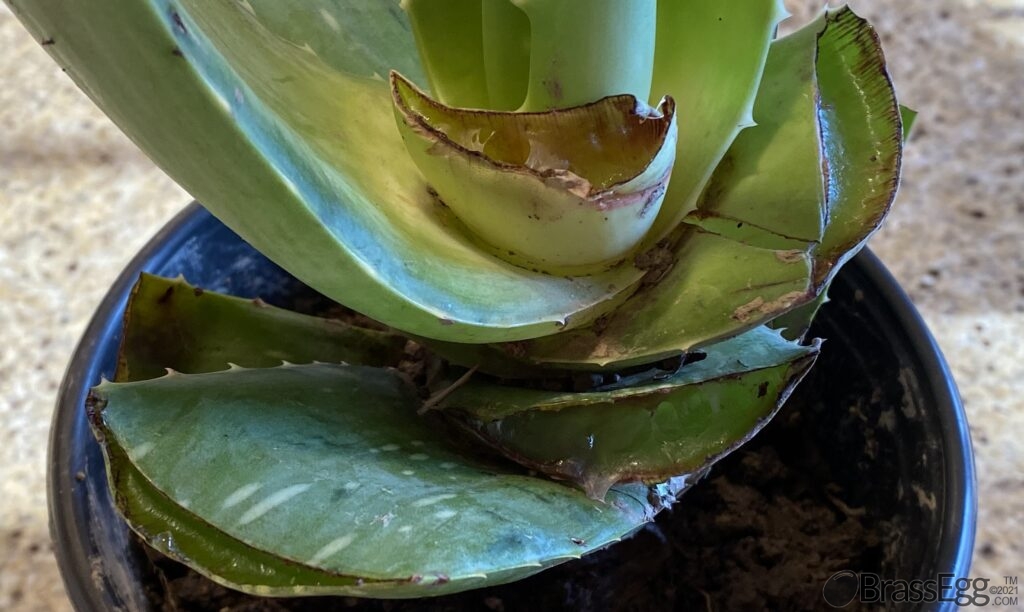
When the broken edges began to dry up I wasn’t concerned. When they began to seal shut on their own I thought that would be the end of it.

Day 5-November 25

When the edges turned pink I figured it was close to being done. The assumption was that each broken spear would stay plump and we could just harvest them the next sunburn that came along.

Day 11 – December 1

It turns out, that any damaged spike continues to die back to the base until it dries up and falls off. I could have saved myself two repottings by simply trimming off all the damaged spikes the day I crunched it.

Day 19- December 9

Within 20 days it was obvious that all the broken spears would slowly dry up and rot off. Another 4 weeks went by to get photos to prove the theory.

Day 47-January 6

Before repotting for the third time, every damaged spear had to be trimmed off. This time I used a paring knife to get a closer trim near the stem/root.

The Aloe had to be set nearly 4 inches deeper than it had grown in the full sun of the garden after all the damaged spears were removed.

The only undamaged spears from the original “crunch” are now gangly and unbalanced.

The roots of this Aloe are shallow and sparse. Four inches of space had to be found so it could be planted deeper, so as much dirt (clay) as possible had to be removed. While teasing the clay out of the roots I discovered two earthworms.

There is no male/female with earthworms, so it only takes two to start making babies. The Aloe will be moved back to the farm in 3 months, so it isn’t a problem to have them live rent free for awhile. I put the breeding pair together and added some coffee grounds as food. That should hold them for a while based on what I’ve read about vermiculture.

Simply splitting open the aloe and using a butter knife to cut the gel free from the skin in one long and wide ‘fillet’ makes it easy to stack Aloe into a zip-lock bag and freeze it for future use. Aloe ‘fillets’ freeze well and give soothing relief from sunburn or acne breakout.

The Mayo Clinic recognizes topical sunburn, acne and psoriasis uses for Aloe, but warns against ingesting it in it’s ‘unprocessed’ form because it damages the kidneys. My dad ended up on dialysis the last years of his life, so the fact he drank Aloe Juice may have been a contributing factor.

Our doctor recommended a processed Aloe pill for my husband, but you aren’t supposed to use it every day. I’ve included the directions and warnings here. I’m not a doctor of medicine and this isn’t medical advice. All I can say is my husband likes this and it works when other products haven’t.

The new growth will come from the center and in time the Aloe will fill out. Next year the Aloe will start in the greenhouse even before frosts are over. It should grow very large by next winter after a summer of sun at the farm.

Brass Egg™ participates in affiliate marketing programs, and may receive compensation when you click and purchase from links to retailers. Brass Egg™ of Russell Holdings Group, LLC 2021. All content ©2021 Russell Illinois Holdings, LLC. All Rights Reserved.

Erosion Problems: Can Willow Spiling Stop Erosion Sustainably and Long Term?

It sounds like a fairy-tale: Weave a living retaining wall that just gets stronger and stronger as the years pass and continue a tradition that is thousands of years old! Willow Spiling is a natural, sustainable, long-term solution to erosion. A perfect example of rediscovering an old practice for modern times.

This land bridge (huge culvert at the bottom of the ravine) was twice this width when we bought the property in 2014. We have debated and gotten multiple repair estimates and had pretty much resigned ourselves to losing this access point because all estimates were cost-prohibitive. I did find some useful ideas like this planter that I could DIY, but this erosion is past the point of even that helping. Willow Spiling is our last option, honestly our only hope at this point. In simplest terms, Willow Spiling is like weaving a basket along any area with erosion…..but every twig used in the basket is still alive with a root firmly anchored in the soil that continues to grow and get stronger over time instead of rotting and getting weaker.

Willow Spiling is simple and low cost, so for me, a great way to protect from erosion. The traditional technique weaves willow branches into a fence or wall and is currently one of the most popular methods for controlling erosion on slopes in China. We are going to take some time here and explore the history of using willow to control erosion, what specific types are best suited to various conditions, and how you can build them yourself.

History

The ancient Egyptians used willow as a natural remedy to stop bleeding, treat inflammation of the stomach and for urinary tract infections. But Willow also served the Egyptians by becoming the natural barriers they needed to fight erosion. In England you are likely to come across Wattle fences at historical sites which use dead wood as posts and dead branches as the weaving material into a huge “basket” that protects gardens, play areas or even as the structure for raised garden beds.

It has been used for centuries to provide shelter, create fish habitats and stabilize the soil on riverbanks. The history of willow spiling in the United Kingdom goes back to the late 1600s, when it was used as a river-bank erosion control method. There are currently a few British companies that can come to your property and install this “soft engineering” but that isn’t an option for us, so you can watch over my shoulder as I plan out this project.

The above hybrid of the wattle fence and the willow spiling is sometimes practiced. Here, two parallel rows of trees are closely planted and pruned in the copicing style so that strong trunks form as fence posts. After branch triming each year the branches are stacked between the trunks as a wall of brush. I like the concept, but the thick layer of brush might create unwanted wildlife habitat in your garden or back yard. Perhaps if the rows were placed closer together it might end up tidier.

Types

Willow (Salix) is an Old English word for a plant that has long, slender stems and branches. It was common to see willow trees by riversides because the wood of the tree easily bends under wind or water force. Willow is a tough, versatile tree with over 300 variaties, so I’m only going to touch on a very few.

The Weeping Willow may be the very first image that pops into your mind when ‘Willow’ is mentioned. The weeping variety grows up to 30 feet tall and has long drooping branches that create an arching canopy when in full bloom. The branches have an appearance of hair and grow best in moist soil with plenty of water. This tree is so distinct and iconic that it is good to imagine this version when you consider the process of weaving living branches into a basket/fence/net to catch soil that is eroding away. It’s easy to imagine those long thin branches being used in that that way. If you’ve ever taken care of a weeping willow then you know what it does to the lawn below it too. Not only the grass-killing shade, dodging the branches while trying to mow but also the constant limb/leaf litter. These drawbacks for lawn usage though are assets when trying to grab and rebuild soil that was lost to erosion.

The Pussy Willow is perhaps the second willow that would come to mind with it’s delicate white fluffy pods. The Pussy Willow is hardy for zones 4-8 and propagets as seeds but even more easily as cuttings. A versatile plant that can grow into a 20 foot tall tree or be trimmed into a small shrub that prefers very wet soil. This was my first impulse to purchase for my project, but it prefers full sun and can only tolerate some shade. In mid-summer my land bridge becomes deeply shaded, so I kept looking.

For my erosion problem, I purchased Salix Purpurea L. also known as Purpleosier Willow from Cold Stream Farm out of Minnesota. According to the US Department of Agriculture, this particular strain is best suited for protecting river banks and there is even a male clone ‘Streamco’ available that does not produce suckers to prevent invasive spread. We’ll see. Willows are known to hybridize on their own and add even more confusion to the already crowded 300 species World Wide. In a year I’ll publish an update on the seedling’s health and how well they are doing for this use.

How To Plant and Build

On their own, Willow trees naturally grow along river banks where their roots hold the soil in place during storms and high water flows. Just through nature, this provides stability for your river bank or ravine edge. It grows rapidly and is resistant to strong winds, heavy rain, and even droughts. All this while offering a wide range of benefits, including increased habitat and flood control. They can grow up to 6 feet in their first year, so periodic maintenance is very important (and encouraging) often in the first year. The plantings can be installed on slopes with any degree of incline and have even prevented landslides in some cases. The best time to plant is in late winter or early spring.

We take the natural benefits of the volunteer Willow a step further by ‘weaving’ the saplings into a living retaining wall while they are young and flexible. The best way to install willow spiling for long-term use is by burying it in the ground at least 2 inches below the surface. There are several techniques, one involves planting larger cuttings/seedlings of willow trees straight up from the ground and then weaving between these posts thin long saplings that have been planted at a tight angle (45 degree angle or even tighter).

Another technique is to use seedlings all of the same size and to plant one row at a 45 degree angle to the left followed by another row at a 45 degree angle pointed right. Weave both seedlings going both directions to each hold equal weight…no reliance on a ‘pole’ in the center. The basket above is offered as an example of how that would be constructed.

My ditch is so steep and the erosion is so aggressive, that I plan to experiment with a technique I haven’t heard anywhere. I plan to follow the first technique with an additional step to anchor the retaining wall. After planting the upright row in a straight line and another row at 45 degrees, I’ll then plant smaller willows horizontally straight into the steep ditch walls at staggered intervals. I will then tie these ‘horizontal willows’ to the upright willows with jute twine and begin their process of weaving into the basket fence. I hope over time these anchors will prevent the entire wall tipping over and into the creek.

I first became interested in how I could use my own forest twigs from reading this great book about using green wood to construct projects. The idea of using living saplings was fueled by this book though.

Brass Egg™ participates in affiliate marketing programs, and may receive compensation when you click and purchase from links to retailers. Brass Egg™ of Russell Holdings Group, LLC 2021. All content ©2021 Russell Illinois Holdings, LLC. All Rights Reserved.

The Fascinating Osage Orange ‘Fence’ Tree

This is from the root of an Osage Orange. It is a fascinating tree that seems to have escaped extinction. Although related to the Mulberry, the Osage Orange is the only species of its genus in the family Moraceae. The roots have had a year to dry out and the small one [at the end of this post] is able to slid out of the encasement. I re-wet the root trying to bring back it’s vibrant orange, but it has lost much of it’s color since it was dug up a year ago. When dry, it is possible to peel off the tissue-paper like protective layer around it’s roots.

The fruit is fascinating in it’s other-worldly appearance. The kids are drawn to it every time they are at the farm. I have no desire to even try to eat it, but apparently something in my forest is having a go at it. I’ve seen them driven over before, but here it appears that wildlife has developed a taste for it. There are four such ‘Horse Apples’ torn up with in a few feet of each other over a four-week span.

The Native American Osage Indians in the area the tree was discovered were the inspiration for the naming of the Osage Orange. As a kid I always assumed the name came from the orange sized fruit that had a bumpy ‘orange peel’ texture. Until I brought this fruit home I didn’t even notice the slight citrus scent. However, no where can I find the root color discussed. It was the basement digging project which exposed these beautiful orange roots. Just guessing here, but this might be where the dye value of the Osage Orange lies.

Hedge Apples, Horse Apples, Bowwood, Thorny Tree or Osage Orange; regardless of the name, this captivating tree is described as ‘picturesque’ instead of beautiful. It’s limbs are dark and dramatic against snowfall. In the heavy shade of summer they create a bit of mystery. Our small farm is blessed with many fully mature Osage Orange trees that border the ravine running down the center of the property. Thousands of miles of Osage Orange were planted in the early 1800’s as a ‘living fence’ around properties to help manage livestock wandering off. By 1874 barbed wire had become king of fencing….ironically often hung on Osage Orange fence posts.

Not only do the branches provide some very large, blunt thorns to discourage a way-ward cow, but the branches tend to grow low near the ground where that would be the most benefit. These thorns are directly responsible for the development of barbed wire…an improvement on nature I suppose. The branches are surprisingly springy and hard to break off which we discovered while trying to dig a basement near an Osage. This springiness is one of the reasons it is also known as
‘bow wood’ because the tree was known to produce very powerful and resilient bows for archery.

This hardy wood is full of irritating sap that makes it hard on the skin but fantastic for repealing insects. The wood is believed to be one of the best available for fence posts because of it’s natural resistance to pests and rot. Supposedly it is possible to cut new growth off them every five years for these fence posts.

This very large, heavy fence post at the corner of the field shows no sign of rot even though the hardware attached to it is obviously many decades old. It was not milled at all and has the limb nubs and taper of a young tree cut off near the ground. It’s black appearance (once the rain washed the dirt away) and texture suggests it is an Osage Orange.

If you want to do a deep dive on the Osage Orange it doesn’t get much more authoritative than the US Forrest Service. This is the type of tree that deserves its own book…and luckily someone wrote just such a book. If you want to plant your own, you can get seeds here.

Brass Egg™ participates in affiliate marketing programs, and may receive compensation when you click and purchase from links to retailers. Brass Egg™ of Russell Holdings Group, LLC 2021. All content ©2021 Russell Illinois Holdings, LLC. All Rights Reserved.