How I Got Back To My Greenhouse After Breaking My Leg

Please note that I am not a medical doctor. What follows is simply my personal experience and does not represent medical advice. The iWalk 2.0 manufacturer notes several times that you need to have a certain level of strength and balance to safely use the iWalk 2.0.

I broke my leg below the calf at my greenhouse when it was under construction. Things happen during construction, but I never hurt myself too badly while putting a floor in that greenhouse, flipping a little bungalow across town or while building my kids a treehouse. I would have expected to break something while doing those things. One might even say I would have deserved it. But no, I broke my leg just slipping in construction site clay after a rainstorm. I had to take a photo with flash because it was 9:30 at night and I couldn’t see what my ankle looked like. It only looked a little swollen, but the pop it made when I landed and the pain let me know it was broken. I had to crawl on my hands and knees into the greenhouse to reach my phone. I was covered in mud.

It gets worse though. My husband was out of state, my son wasn’t old enough to drive and I couldn’t get my closest friend on the phone. I had to call 911 for an ambulance. Then it gets even worse. The heavy rain had made the construction site a huge clay slip and slide. They sent a County Deputy in to locate me. He amazingly CARRIED me a football field length with very little traction from the Greenhouse far enough up the hill that the EMTs could reach me.

I had to have surgery to reattach the fibula to the tibula, put a metal plate in, and reattach a tendon. It looks like deck screws holding me together. Because of the torn tendon I wasn’t able to even put my toe down to balance myself. Absolutely no weight bearing. After a month of crutches my left hip, knee and ankle were beginning to ache at night. Oddly, my right leg and hip was also beginning to ache from dis-use! Using a ‘peg-leg’ style crutch for my broken right fibula took pressure off my left leg. The iWalk 2.0 also helped my thigh to begin building back the lost muscle and the thigh pain went away. The calf continued to wither, but that just couldn’t be helped. Both hips and the left leg began to feel better and I finally felt like I was on my way to recovery.

I used the iWalk 2.0 hands free crutch for the first time a month after breaking my leg. It took a few days to get used to because I was still in pain and very afraid of falling and hurting myself worse. It literally changed my daily life. It gave me more freedom and the ability to help my worn out husband around the house. I was able to move laundry, wash dishes, help set the table and go up the stairs (going down the stairs is a real trick).

I asked my physical therapist about it, and she said every client who had gotten it was raving about it. The instructions will tell you that you must be physically fit enough to use it though. I actually had waited longer than I should have and lost a lot of strength in that month of regular crutches. My balance and muscle strength had gotten terrible and I actually used crutches with the peg leg crutch for nearly 3 days before I felt safe enough to rely completely on it.

Perhaps the most exciting thing for me was that the iWalk 2.0 made it possible for me to get back to the farm. The greenhouse was finished a little while after surgery and I hadn’t been able to be there by myself because I couldn’t carry anything or stand for any length of time. After regaining some strength with the hands-free crutches, I was able to feed the chickens, collect eggs and pick tomatoes. The pullets didn’t lay eggs in the nesting box, so I got some physical therapy out of it too! Couldn’t have climbed into the coop and under the hawk net with regular old crutches.

A few details about the iWalk 2.0: it adjusts in several different directions to accommodate all types of heights and leg diameters. The ‘foot’ or ‘shoe’ on the bottom is made of a great type of rubber that doesn’t slip, but that has a downside…it can trip you up if you don’t lift it high enough. There was certainly a learning curve in using it. An hour or two was all I could use it at first because I had lost so much strength and gone downhill so far.

I also had to nab one of my daughter’s volleyball knee pads because my cast created a void between my knee and the lower leg platform. You also have to take it off every time you go to the ladies room [lucky men]. Eventually a boot was prescribed and I disassembled the iWalk 2.0 and put it back in it’s box. I’ll be keeping it with all my other First Aid kits. If I had started using it earlier I don’t think I would have lost as much strength as I did. I certainly would have been able to enjoy my greenhouse sooner!

Brass Egg™ participates in affiliate marketing programs, and may receive compensation when you click and purchase from links to retailers. Brass Egg™ of Russell Holdings Group, LLC 2021. All content ©2021 Russell Illinois Holdings, LLC. All Rights Reserved.

Best Way to Kill Flies in the Greenhouse or Barn – A DIY Flytrap

I built this fly trap just like the ones you see on the Internet all the time. I was running out of time as I left the house and mixed up the liquid lure from memory. It was not the lure I had written down. Oh well…now I can do an experiment comparing the different lures and give you the results.

Why not just buy a fly trap and be done with it? I may do that in the end, but I love a good DIY solution that lets me use up plastics in my recycling bin. By mixing my own lure I also know if I can compost the flies whereas I have to trash the store-bought lures because I don’t know if there is poison in them or not. I have heard good things about the store-bought traps that are reusable, and easy to hang, so that might be the next-best thing to making my own.

For this trap lure I mixed 1 cup of white sugar with 1 cup of apple cider vinegar. I cut the 2-litter across at 7″ from the bottom/table top. I’m going to take the plastic ring off the bottle neck of the next one just in case that is giving the fly a target to aim for, and I will cut closer to where the bottle begins to bend to see if that gives a slightly better connection point for taping back together. The next trap will use 1 cup sugar, 1 cup water and 1 teaspoon of yeast.

I have been having problems with flies for over a month. It started in the fall of 2020 just a few months after the Greenhouse was finished. I had over a hundred flies November 5th. They were all on the outside of my barn warming themselves on the dark green metal as fall began to blow in. I don’t know if they were all coming from the chicken coop or if that is normal, but I was relieved that they were outside. I shouldn’t have been so relieved.

Two weeks later on November 19 there were flies inside. Not as many as outside…I guess only a portion found their way inside.

The flies disappeared and then 9 days later they were back with a vengeance. The sunny day brought the greenhouse temp up to the 90’s even though it was chilly and windy outside. It looked like hundreds this time. The sound was disturbing. Sort of like being inside a metal bee hive, but a much softer sound…flies are lazy compared to bees!

Before heading home I placed a solar light next to the trap to make it more attractive to insects as it gets dark and cold each night. I only saw one live fly in the greenhouse, but I don’t trust that they are gone yet. It was 34 degrees outside, and inside was 46 degrees…but on a sunny day it can get much, much warmer. I don’t know where they are hiding, but I am ready for the next big fly festival.

Brass Egg™ participates in affiliate marketing programs, and may receive compensation when you click and purchase from links to retailers. Brass Egg™ of Russell Holdings Group, LLC 2021. All content ©2021 Russell Illinois Holdings, LLC. All Rights Reserved.

Too Late To Plant Rye Grass or Too Early? Trick to Sprout Grass Faster and Manage Erosion.

Planting Rye grass is the very first thing you do after disturbing the ground. Planting Rye grass is the last thing you do at the end of the day to protect whatever soil is still bare. No matter what the weather. That is my opinion. It is cheap enough to make a mistake with. Maybe it will be too dry for it to germinate, or maybe there will be a surprise shower and the Rye will sprout overnight. It does no harm to have it out a little too early in the season or a little too late because this grass takes advantage of every warm or sunny day and keeps going all winter.

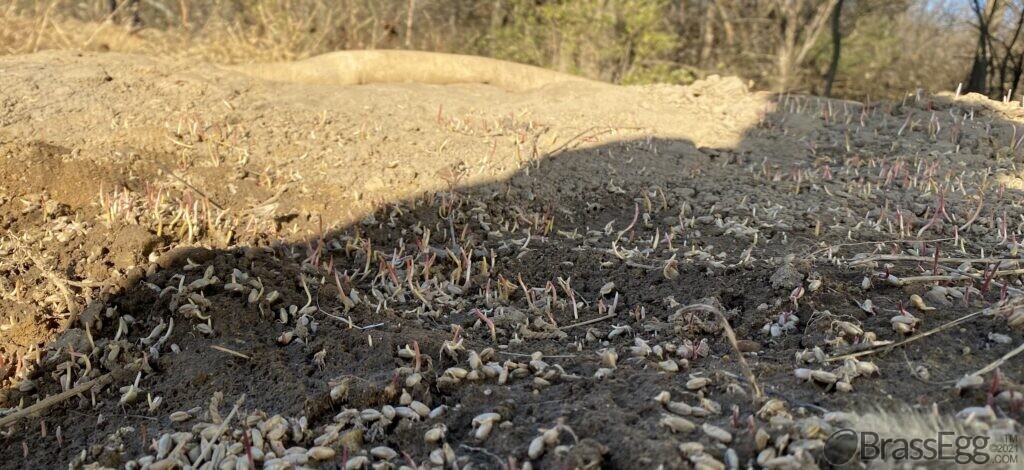
While everything else is dying, the Rye Grass is sprouting! November 28th.

Rye Grass is amazing for all sorts of applications. I wish I had discovered it early on in the construction of my barn because I could have saved a lot of muddy days and wheel barrow work. Since the basement of the barn was put in at the end of October I thought I would just have to wait until Spring to get any grass to grow. It was a warm winter though, and I could have had grass growing before the post and beams went up in December.

I had heard of Rye Bread, but never heard Rye grass was so hardy. It will germinate at temps as low as 43° if the moisture is right. Old timers used to throw Rye seed right on top of the snow, so I tried it January 31 after learning about it. Once it has established a root, it will grow a little any warm day you get in the fall, winter or spring. It won’t die or even go dormant in below zero weather…in fact it will still be green. What kills it is 95° heat. Have two or three days of that weather and you will notice the stand will go golden brown.

The backhoes are long gone and we continue to correct the grade around the barn using wheelbarrows. The ground keeps settling and more and more dirt has to be added to maintain a slope in front of the barn. Water accumulation on the field side of the barn is really concerning going into winter. At least an acre of land lies up hill from the east side and we don’t want rain-water soaking in, freezing and cracking the foundation. All this earth moving is hard work, so we don’t want to lose any more dirt to erosion than we have to. We’ve used carpet scraps that neighbors put out on trash day to control the slipping in the mud and to stop erosion. Professional versions of these are called ‘Swamp Mats. However, it wasn’t until recently that I discovered that those same carpet scraps could also be used to speed up germination of Rye grass seed.

My youngest wanted to earn some money, so I drove him out to the barn to move wheelbarrows of dirt even though a huge rainstorm was predicted at sundown. He did a great job and we raked it to the right shape for shedding water and sowed Rye grass all across the top. As we were finishing up we could see the thunderstorm coming in the distance so I grabbed the muddy scrap carpet and put it over the newly laid seed just to keep them from getting washed away. [We have thick lush Rye grass ditches and gullies because the seeds get washed all to one area despite straw used as protection].

November 18th Discovery

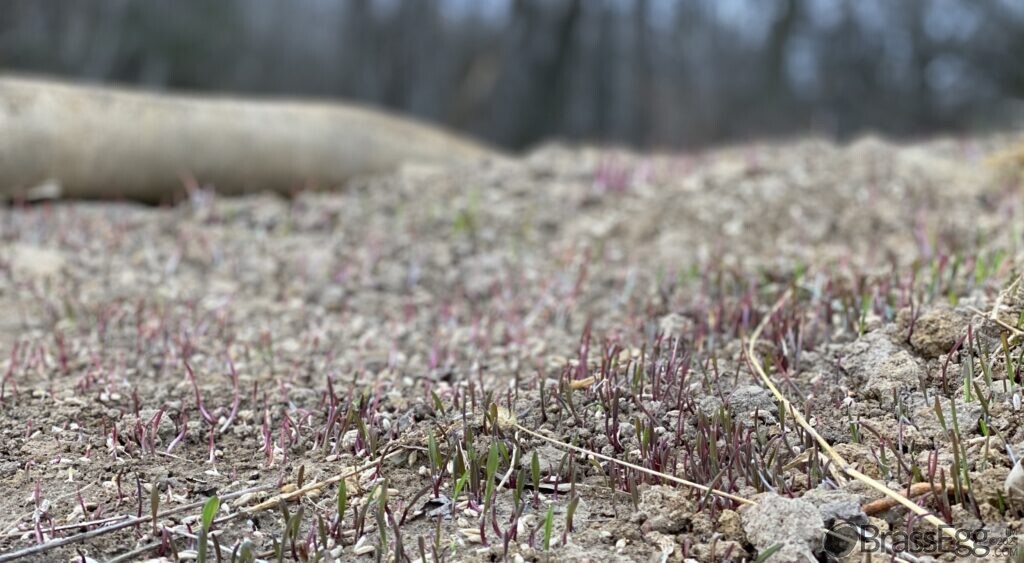
We returned a few days later to move more dirt on November 18. When we pulled off the carpets the Rye was not only all evenly distributed, it had also sprouted in record time. The little sprouts are a unique and pretty red that change to green as they mature. Thanks to the soaked carpets the seed was kept at the perfect moisture level and the thick carpet made it impossible for birds to eat. If you leave the carpet on too long it will kill the seedlings, but simply checking every 3-4 days is usually sufficient to prevent that problem. The following photos will show how much progress it made over 10 days in November.

November 20th
November 28th

Without carpets to hold the seed in place during rain, keep it moist for germination and fend off the birds, this is the kind of sprout density you get on a slope even in the summer. The seeds find it hard to get a start in straight clay. Note that the drip line off the roof is very deep.

Because of the early start Rye grass gets it is used as a ‘nursery grass’. That means when you are trying to put in a regular perennial grass that needs heat to grow, the Rye grass seed sprouts first and protect the warm weather grasses as they take longer to put down roots. The plan here is to sow perennial Alfalfa into the annual Rye grass in the spring. We will see if Alfalfa is a good grass so close to the barn. I love Rye so much maybe I should buy the more expensive Perennial Rye Grass too so we have green grass all winter, every winter.

Brass Egg™ participates in affiliate marketing programs, and may receive compensation when you click and purchase from links to retailers. Brass Egg™ of Russell Holdings Group, LLC 2021. All content ©2021 Russell Illinois Holdings, LLC. All Rights Reserved.