HUNTER Rubber Boots: An Honest Review

As An Amazon Associate I Earn From Qualifying Purchases At No Extra Cost To You Learn more.

Let’s cut to the chase, $100 rubber boots are an incredible extravagance. As you can see, my boots are still in pristine condition because I haven’t had the guts to wear them to the farm yet.

The rubber of the Hunter Boot is soft and buttery, much more flexible than my other pairs of rubber boots. I chose the matte “Military Red” instead of “Red”, “Hunter Red” or “Red Gloss”. The closest thing I can compare it to color-wise is the plastic lid on a 2020 jar of cashews from Costco, if that serves you. I was concerned that the other three reds would be too bright, but now I wish I had kicked it up a notch! “Red” really lights my fire, “Hunter Red” is my favorite shade and “Red Gloss” would certainly turn heads, though I’m not sure how well the gloss finish would hold up to farm use.

My mistake was ordering the “Tall” version. I have large calves and boots are often a struggle because of this. HUNTER labels their mid-calf boots as “short” boots which is confusing because their truly short ankle boots are also labeled short. I obviously should have spent more time figuring this out. You can see in this photo that my right boot looks almost normal, but the left boot has an awkward bulge around the ankle. My right calf is still small from months of being in a cast, but my left calf is too large for the narrow opening and is pushing the boot down. Particularly bad because that is one of the common break points on my rubber boots from the rubber constantly flexing back and forth. I probably would have been better off with the “Original Short” in “Red Gloss”.

Those are all fit issues that you may not have. I can say that I had only seen a few women wear Hunters in America. All I knew was that HUNTER rubber boots were revered and they had been around for over 100 years.

Having my own became my 2020 Mother’s Day wish. When I unwrapped them I learned a lot about the company. HUNTER was founded in 1856, and they hold a British Royal Warrant as a supplier of Waterproof footwear to the Queen and her husband. They are obviously proud of that fact, but as Americans it’s hard to appreciate what a big deal a rubber boot is in Britain.

I had red rubber boots as a little kid and then went 20 years without even trying on a pair until I moved to England in 2008. In England, if you like the outdoors you will constantly have wet feet if you don’t own a pair of rubbers! Got your attention? In England rubber boots are called ‘rubbers’ or ‘wellies’…. I had to work so hard with my pre-school children to get them to say ‘wellies’ only. I knew we were eventually moving back to the U.S. and didn’t want them embarrassing themselves or us. My absolute favorite pair is regular black with a cloth collar. I would wear them on one-mile walks through the woods. I have finally worn them to the point they leak, but they fit so well I leave them at the Greenhouse as a back-up pair. I bought them in England and don’t think I’ll ever find a pair just the same. A girl can dream though!

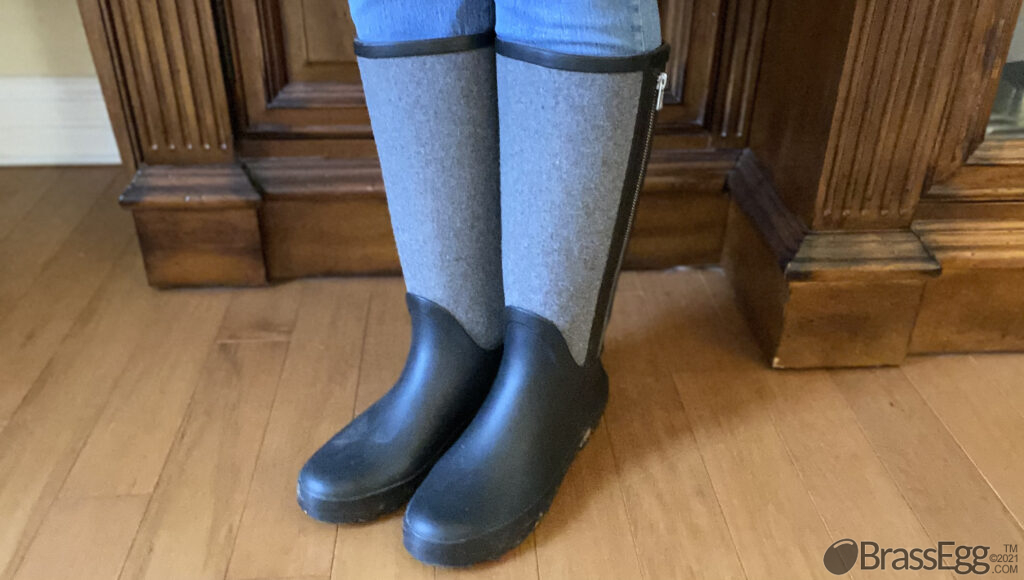
This grey pair also has a place on my shelf because they are attractive and affordable enough that I have had the guts to wear them. Even though it has a non-functioning zipper which is a shameful piece of dishonesty, it is a very practical color with a little style thrown in for free.

You can see that they are 2″ shorter than the HUNTER boots, so not actually a mid-calf, but not so long that they bunch up around the ankle. They also have a back seam-cover that is only 3/4″ while the HUNTER boot has a 1-3/4″ seam-cover.

It sports something practical the HUNTER doesn’t have though. The grey pair have pull off bumpers at the heels save you the trouble of finding a boot jack to pry off your clay-covered boots. In the above photo you can see the bumper to the left of the BrassEgg.com Watermark. Below you can see how the bumper makes removing your boots so much easier. However, the greys don’t have near the tread that the HUNTERs do.

All in all, a pair of HUNTERS is a chance to own a British status symbol…which makes it a great gift for a budding homesteader! Just be aware of some of the fit issues. If you choose to go with a less expensive rubber boot, consider how the pattern and finish will ‘patina’ with real use. Boots that have designs printed on the outside might wear off oddly and gloss may scuff oddly. Choosing a pair with the design under the clear rubber protects the design and creates a bit of a ‘jewel’ appearance on your feet. Like my cute garden clogs.

Brass Egg™ participates in affiliate marketing programs. As An Amazon Associate I Earn From Qualifying Purchases At No Extra Cost To You Learn more. Brass Egg™ of Russell Holdings Group, LLC 2021. All content ©2021 Russell Illinois Holdings, LLC. All Rights Reserved.

About The Mission

As An Amazon Associate I Earn From Qualifying Purchases At No Extra Cost To You Learn more.

Brass Egg was created to help bridge the gap between the soul-feeding and very practical aspects of ‘working the land’ and the very comfortable and fashionable modern life we all live today.

Brass Egg’s Mission is to inspire the building of charming little farms across the world as we invest our free time in hobbies that get us outside in the sun and fresh air using our creativity to prepare our homes and family for the abundance that comes with a hobby farm. Brass Egg endeavors to lead the way with inspiration that makes hobby farming attractive, easy and healthy.

While trying to convince my family that we should move out of the subdivision and onto a farm it became obvious to me that they weren’t little kids anymore. Little kids get so excited about the idea of having baby chicks around and maybe some sheep and my youngest wanted his own pig because in Minecraft you can ride a pig like a horse. They were so excited then. Now they are teenagers and they are concerned about the size of the bedrooms in a farmhouse and if their cellphones will work out there. Their image of farm life equals hardship, lack and constant work.

They aren’t alone. That is a consistent perception. When I was a kid our pipes froze in the winter, most of my clothes were homemade and there was constant work. I hated our garden and steered clear of any boy who planned to be a farmer.

Decades later I view my childhood differently.

Growing up my life was filled with Abundance. We had 5-gallon jugs full of our own honey stored in the attic. We had a forest of firewood that kept our family warm and deer that kept our meals interesting. My high school experiment with dairy goats kept our fridge full of whole milk and cream. Before I was born the freezers were full of our own grass fed beef and forest raised pork.

Growing up we were Prepared for most anything. My parents ran a K9 training school and kennel that dad started as a police officer, so there were always a few well-trained security dogs at the house. The photo above is me with a trained Police Dog who was very dangerous…dangerous for anyone who might try to hurt a retired officer’s little girl. Since it’s best to burn wood that has cured for a year, we always had enough wood on hand for two normal winters (even if half of it would be a little more difficult to burn). Huge gardens mean huge harvests, and canning and freezing that harvest meant we went into winter with over-flowing pantries. Both my parents grew up as the Great Depression ended, and they internalized the lessons of thrift, self-sufficiency and hard work.

With all that going for us, why didn’t I view my childhood as being Prepared For Abundance? My dad had a vision for life after retirement that he modeled after the old Western Bonanza, complete with horses and an actual wall-to-wall library. However, the Inflation Crisis of the 1970’s and my dad’s failing health put us in survival mode instead of thriving and innovating.

Today I fully grasp what my dad’s vision was, and thanks to the Internet I’m not limited to the stacks of old Mother Earth News magazines on the bottom shelf of our library. Vintage ‘back to the land’ books by Sunset may be where my first dreams were formed, but I am taking it forward. For the sake of my family I want to bridge what they think ‘back to the land’ means to the charmed and beautiful life I want to build for them.

I want to bridge it for you too. Join me in building a beautiful life for yourself where we garden or keep bees or raise goats not because we fear the future….but because we enjoy preparing to live in abundance. Join me as we do very practical things with the style and joy of a hobbyist. I am willing to help anyone who is new to this journey or anyone who is on this journey and getting a little weary. Time is precious, so I’m happy to help you shave a few years, months or just weeks off your journey back to the land.

There is extra work you have to put in to make ‘Homesteading’ or Hobby Farming fit into a modern lifestyle. Keeping neighbors happy, extra farm chores, keeping up with housework when you really want to be outside digging in the dirt…. Let’s talk about it. I’ll show you around as I try inspire my kids, hubby and neighbors to try something old.

Brass Egg™ participates in affiliate marketing programs. As An Amazon Associate I Earn From Qualifying Purchases At No Extra Cost To You Learn more. Brass Egg™ of Russell Holdings Group, LLC 2021. All content ©2021 Russell Illinois Holdings, LLC. All Rights Reserved.

Make A Huge Hot-Seat Reusing Styrofoam and Feed Bags

As An Amazon Associate I Earn From Qualifying Purchases At No Extra Cost To You Learn more.

This is a triple win, and I’m so excited to share it with you! We are going to reuse TWO hard to recycle plastics and turn them into a fantastic resource so you can keep working through the harsh winter. I ran into some big obstacles with this project, so read to the end before jumping in…better to be forewarned! The first step is to save all that Styrofoam.

About 2013 I bought this bean bag cover at Sears on clearance for about $4 and I had no intention of paying $25 for packing peanuts. Today, using Bean Bags As Stuffed Animal Storage is a common thing, so I was really ahead of my time…only I tend to save things like packing peanuts, so the bean bag cover became the place we ‘stored’ packing peanuts. Then I started putting other stuff in there like this random egg carton, the foam inserts out of worn out seat cushions and a “We’re Number 1” foam finger in there somewhere.

The next thing you will need for this project is a feed bag. The burlap bags of grandpa’s days would be great if you can get your hands on them, but this project makes use of the woven plastic feed bags currently used. The paper bags of my child hood won’t give you satisfactory results…especially if you hope to use this huge hot-seat to sit on the snow while working outside. Even better than burlap in that case. Just ask a friend for one. Most livestock owners have a few empty feed bags stuffed in a nook somewhere.

Wipe out your feedbag really well and spray the inside and corners with Lysol or Febreze or essential oils that mice hate. Having a mouse chew into your heat bag because it still smells like food would be disappointing. My unrealistic fear of mice is one reason I chose this white bag with very little lettering. Against the sun I can ‘see’ through the bag and most of the white foam. If you have a more colorful bag, don’t worry, it will work fine. If you are at war with rodents just be aware of how and where they might camp, just check like you would a regular hot-seat that you buy at the store.

Next, you want fill the bag with Styrofoam. No need to be picky here. You can save the good packing peanuts for your kid’s bean bag and only use scrap Styrofoam if you want. That’s what I did. When I went to retrieve the lower-quality Styrofoam from the bean bag I did run into a problem. The broken Styrofoam I had put in had made a mess…as Styrofoam does. The worst pieces were the corner blocks that get compressed for electronics or glass light fixtures. Those are pretty hard and don’t move around like peanuts and random foam does to accommodate your bottom. When they break you have a mess on your hands. This is where my project became a huge mess and took an extra day. But, I will show you what I did, what didn’t work and what you can do to get around it.

Those little static cling white dots of Styrofoam make me crazy! I realized if I could scoop the Styrofoam with a hot utensil that there wouldn’t be breakage….there would be nice, small homemade peanuts. So I looked up a YouTube video on how to make a ‘Hot Wire Styrofoam Cutter’. I am not going to link to any of these videos because when I made mine the battery got hot but the wire did not! I put a few hours into this trying to scrounge materials from the garage, kids rejected toys, and assembling with the hardware I had on hand. The heat of the battery really alarmed me. It might be dangerous….better to buy something an electrician built.

As I put away the hot-glue gun I noticed that my soldering iron came with an Exacto-knife blade attachment. I thought that might be exactly what I needed, assuming it would cut through the foam like a hot spoon through ice cream. I was pleased at first, but after just a few minutes the wide and short blade accumulated so much melted plastic it constantly smoked/off-gassed. It was not a pleasant smell and probably not great for me to breath. An actual blade creates too much ‘drag’ which is totally unnecessary and becomes a sticky surface. So I went back to the web and tried new search terms and discovered these things that let you not only cut Styrofoam into little packing peanuts…you can carve all sorts of artistic things with them! I never knew! It seems a much safer option than my 9 volt battery DIY version that I was afraid would blow up in my hand.

The above close-up shows how a hot knife sealed the edges of the foam, whereas breaking it creates a cascade of static-charged dots. After the Styrofoam phase of this project I spent at least 45 minutes cleaning up the only way you can: a pet hair attachment for a vacuum. I don’t know any other way you can get 200 tiny charged dots of foam off the carpet, bean bag, clothes…. At this point I was mad at myself and swearing I wouldn’t do this again.

Sewing the bag together was easy using a long stich on the sewing machine though. This stich is made as near the opening as possible, with the ends folded over to match the store-sewn bottom. A second pass using the ‘tape’ that comes off when you open the bag was added about 1/2 inch in from the first stitch. Using a long stitch and adding the second stitch in a different location is important because a stitch can become a “perforation” if the tiny holes are too close together and the plastic is compromised too much.

The frustration from cleaning up Styrofoam last night is all forgotten now that I have this huge hot seat! It has been so cold in the greenhouse this winter that it’s hard to stay more than a few hours. It can take a few hours to just look over the next project and try out some ideas. If I happen to get wet during a project it’s impossible to get warm enough to continue the project. This should keep my knees and backside dry and hopefully be what I need to finish up the flashing I am experimenting with while sitting in the snow.

Brass Egg™ participates in affiliate marketing programs. As An Amazon Associate I Earn From Qualifying Purchases At No Extra Cost To You Learn more. Brass Egg™ of Russell Holdings Group, LLC 2021. All content ©2021 Russell Illinois Holdings, LLC. All Rights Reserved.